Pilates Magic Circle Exercises
The Pilates Magic Circle is becoming very popular throughout the fitness world.
It is versatile and portable, and offers a great workout for very little money.
What is a Magic Circle?
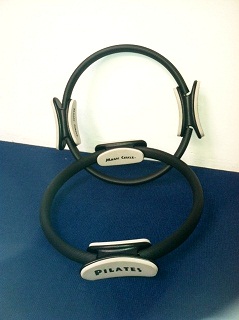
The Pilates Magic Circle, also known as a Pilates ring, exercise ring, or fitness circle, is a ring, usually made of flexible metal or rubber, about thirteen inches in diameter, with small pads on either side. The circle itself provides a low level of resistance as you press against it.
Why use a Magic Circle?
Magic circles add light resistance to Pilates exercises and help target specific muscle groups. They are often used to help tone the arms and thighs, and increase the core strength challenge of an exercise.
Here are seven ways you can work magic on your body with the Pilates Magic Circle:
1. Strengthen your hardest-to-get-to-areas, including your pelvic floor muscles and inner thighs
2. Develop balance and muscle control
4. Develop your core or powerhouse
5. Tone your glutes, hamstrings, chest and arms
6. Intensify the Mat exercises
7. Take it on the road—it travels well!
How do I choose the right Fitness Circle?
With the popularity of the Pilates Ring, a wealth of choices has sprouted up. While buying a Pilates Magic Circle won’t break the bank, with prices ranging from $18 - $75, you do want to get the one that is best for you.
It used to be that there were pads only on the outside of the circle. The new trend is to put pads on the inside of the ring as well.
I prefer having pads on both the inside and outside of the circle as they add to the versatility of the magic circle.
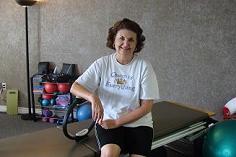
How do I use the Pilates Ring?
Before working with a Pilates Ring, it’s best to do a little warm-up. This can be as simple as marching in place for a few minutes, are going up and down some stairs.
Also, here’s some valuable advice:
Don’t pick up the Pilates Magic Circle and try to crush it inwards as far as you can, which is what I see most of my clients do at first!
The circle is not intended to provide a big resistance challenge.
It is designed to provide gentle to moderate resistance in an exercise. It also gives your body feedback as to where it is in space and which muscles are being used. It is similar to using a Pilates resistance band in that it works both ways.
Pilates Magic Circle Exercises:
Okay, let’s get started! Here are three Pilates Ring exercises to try.
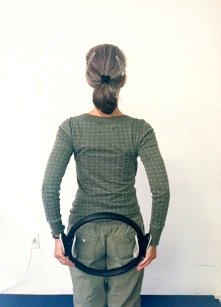
Triceps Press with Pilates Ring
Position: Stand with your feet shoulder distance apart. Your knees can be slightly bent, or straight, but not locked.
Activate your abdominals by pulling them in and up, and drop your shoulders away from your ears.
Grasp the Magic Circle behind your back, with your elbows bent, and arms parallel.
Exercise: Use a pulsing motion to push the circle in and release it. Control both the inward push and the release.
Try to keep your arms parallel and shoulders dropped. Feel the action in your upper back and triceps. Start out with 5 pulses in 5 sets. Gradually work your way up to 10 pulses in 8 sets.
Tips: Remember, this is only a small motion! You will feel it in those triceps with very little movement.
Make sure your chest is open, and keep your ribcage from popping forward by engaging the abdominals.
Keep the circle low at first. Only go as high as you can keep the arms parallel and the ribs dropped.
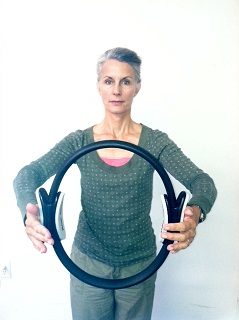
Pectoral Press with Magic Circle
Position: Hold the circle with relaxed hands and raise to chest height. Bend your elbows.
Exercise: Exhale, press for a count of 4 with both hands together. Release, inhale for count of 4. Repeat 5 times, rest, then repeat 5 more times.
Tips: Keep your spine is lengthened with shoulders and neck relaxed. Chest is open.
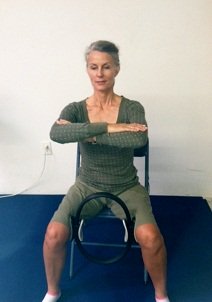
Seated Leg Press with the Pilates Ring
Position: Perch on your sitz bones (base of the pelvis) at the edge of a firm surface, like a chair.
Position the Magic Circle between your legs, just above the knee.
Sit tall, and place your legs parallel to each other, with feet flat on the floor. Drop your shoulder blades down your back, keep your ribs in, and cross your arms in front of your chest with your elbows up.
Exercise: Activate your pelvic floor and scoop your abdominals by pulling them in and up.
Keep this area active as you squeeze the circle with your inner thighs, and hold for 3 counts. Exhale, slowly release the circle. Repeat 5 times, rest, then repeat 5 more times.
Tips: Breathe deeply into your sides and back. Keep your pelvic floor and abs active.
Warning: If you release the tension too quickly, the Magic Circle might pop out from your legs and become a deadly force! Aim for muscle control.
This has been just a sample of some of the “magic” ways you can tone up your body with the Pilates Magic Circle.
You have to admit that Joseph Pilates did come up with some interesting and creative names for the equipment he invented, like the Reformer, Cadillac and Wunda Chair! His ideas for exercise equipment originated from simple, everyday items.
He used anything he could get his hands on—like his bunk, the bedsprings or a chair.
Rumor has it that Joseph crafted his first Magic Circle from the ring on a beer keg. That thought could lend a little “party atmosphere” to your workout!
Recent Articles
-
Pilates after Total Knee Replacement
Apr 23, 20 06:20 PM
It's 2 yrs.post op since I had total knee replacement in both knees. In order for them to last it's recommended that you lift not more than 25 lbs. Pilates -
SI Joint Pain Improved with Pilates!
Aug 11, 17 12:29 AM
Dear Jennifer, I just wanted to reach out and thank you for dramatically improving and changing my life. About a year ago, I woke up in debilitating -
Hip pain after 4 months of Reformer Pilates
Jul 12, 17 06:44 PM
Hi, I had a total right hip replacement 8 months ago; I rehabbed really quickly, although I was also (and still am) dealing with L4 spondylolisthesis.
 | Get Instant Access to Loads of Color Pictures, Postures, and Information Designed to Increase Comfort and Happiness. Learn to Enjoy Life Again! Learn More! |

New! Comments
Have your say about what you just read! Leave me a comment in the box below.